Page History
The Bridgehead is an interface application for WebSphere that transfers IBM Connections statistics directly to ConnectionsExpert.
Follow these steps to deploy the Bridgehead application on your WebSphere server.:
| Table of Contents | ||
|---|---|---|
|
| Note |
|---|
In the Bridgehead installation described here, the EAR will be installed in the AppsCluster, so all scopes are set to AppsCluster. If you want to deploy the EAR to a different Cluster, please adjust the scope. |
1. Download and copy Files
In the ConnectionsExpert web interface, navigate to the Configuration view by clicking on the cogwheel icon (top-right corner). In the Configuration view you can download the ConnectionsExpert_Bridgehead.zip. This archive includes EAR and configuration files for the installation of the so called Bridgehead:
...
Please copy the folder "pbh" into the Connections customization directory.
2. Configure the adminclient.props settings:
| Code Block | ||||
|---|---|---|---|---|
| ||||
host=<dmgr_fqdn> (<!--default: localhost) --> port=<dmgr_soap_port> (<!--default: 8879) --> type=SOAP securityEnabled=true username=<username> password=<password> autoAcceptSignerForThisConnectionOnly=true |
...
| Note |
|---|
localhost only works in non-clustered environments. Please use the hostname (FQDN) in clustered environments. |
Enter your username and password and configure the other settings according to your WebSphere environment.
You need to add a WebSphere Administrator Account here, no special Connections access roles are needed.
So you can use an already existing account (local or LDAP), or you create a local WebSphere Administrator Account.
Create a local user Users and Groups > Manage Users > Add… and add this user to
Users and Groups > Administrative user roles:
Figure 4: User Roles
Optional: To encrypt the password in the adminclient.props you can use the following command:
- Linux:
/opt/IBM/WebSphere/AppServer/bin/
PropFilePasswordEncoder.<sh|bat> /<path_to_pbh_dir>/
adminclient.props password
- Windows:
<customer-specific>\WebSphere\AppServer\bin\PropFilePassword
Encoder.<sh|bat> <path_to_pbh_dir>\adminclient.props password
3. Create WebSphere Cluster
 In the WebSphere Integrated Solution Console (ICS) go to to Clusters > > WebSphere Application Clusters. Create a cluster with one or optionally more nodes. Figure 5: Create Cluster 1

Figure 6: Create Cluster 2
 Figure 7: Create Cluster 3
...
| Note |
|---|
In clustered Connections environments you can select more than one node to install the panagenda Bridgehead on. |
 After creating the application servers, please change the JVM maximum heapsize setting to a value of 2048.
Figure 8: WebSphere Cluster Heapsize
4. Create Shared Library
 Go to to Environment > > Shared Libraries, select the scope on which your Bridgehead should run (CustomAppsCluster) and click on the the New... button button:
Figure 9: Create Shared Library 1
Enter "pbhJython" in the Name field and use a Classpath based on the Connections Customization directory, such as
${CONNECTIONS_CUSTOMIZATION_PATH}/pbh/jython-standalone-2.5.3.jar
(WebSphere Variable: CONNECTIONS_CUSTOMIZATION_PATH.) 
Click on on OK when when you are done:
Figure 10: Create Shared Library 2
5. Create URL Resources
In the ICS go to Resources > URL select the scope on which your Bridgehead should run (CustomAppsCluster) from URLs and click on the New... button. Use as specification like
file:///$\{CONNECTIONS_CUSTOMIZATION_PATH}/pbh/...
panagenda Bridgehead Admin Client Properties
Name:
panagenda Bridgehead Admin Client Properties
JNDI Name:
url/bridgeheadAdminClientProps
Specification:
 file:///$\{CONNECTIONS_CUSTOMIZATION_PATH}/pbh/adminclient.props Figure 11: Create URL Resources - Example
panagenda Bridgehead SQL Queries
Name:
panagenda Bridgehead SQL Queries
JNDI Name:
url/bridgeheadQueries
Specification:
file:///$\{CONNECTIONS_CUSTOMIZATION_PATH}/pbh/queries
panagenda Bridgehead jyscripts
Name:
panagenda Bridgehead jyscripts
JNDI Name:
url/bridgeheadJyScripts
Specification:
file:///$\{CONNECTIONS_CUSTOMIZATION_PATH}/pbh/jyscripts
6. Deploy EAR
In the ICS go to Applications > Application Types > WebSphere Enterprise Applications, click the Install button and select the path to the file bridgehead.ear:

Select Fast Path and click Next.
Figure 12: Deploy EAR 1
Just click on Next in Step 1 (no need to adjust/change anything here).
In Step 2, select the newly created cluster and a web server.
| Note |
|---|
...
For licensing reasons, the Bridgehead application has to be accessible via the Connections HTTP server. If this is not possible in your environment, please |
...
contact support@panagenda.com. |

Figure 13: Deploy EAR 2
In the next step, map JNDI names for URLs and all DataSources:

Figure 14: Deploy EAR 3
Continue the steps and click on Finish. 
Wait until you see the message "Application panagenda Bridgehead installed successfully" and click on on Save:
Figure 15: Bridgehead Installed Successfully
7. Map Shared Library Reference
In the ICS go to Applications > Application Types > WebSphere Enterprise Applications, select panagenda Bridgehead and set Shared library references to "pbhJython" 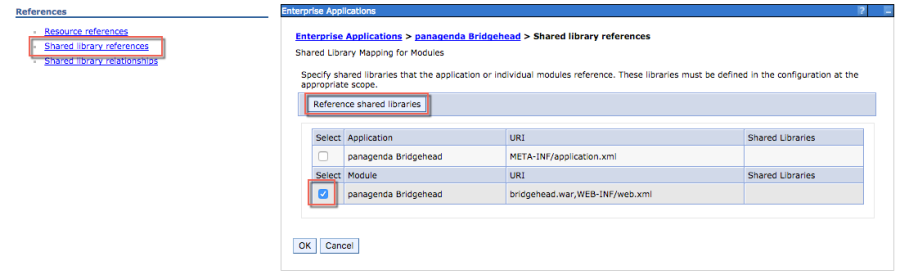
Select the second entry and click click Reference shared libraries
Figure 16: Map Shared Library Reference 1
 Add
Add
Add "pbhJython" to the right box and click click OK:
Figure 17: Map Shared Library Reference 2
Your shared library reference should look like on this screenshot:
Figure 18: Map Shared Library Reference 3
Close with OK and save to master configuration.
...
...
8. Change Security Role
 Please assign the the pbh_admin role role to the user which you use on the ConnectionsExpert Configuration page (see "User Accounts:" on page 6in the ConnectionsExpert Setup Guide):
Figure 19: Security Roles
9. Restart Cluster
Please restart the newly created Cluster or Application Server (which is used for the Bridgehead application) in order to get everything initialized. 10Populate
10. Populate Web Server Plugins
| Note |
|---|
...
For licensing reasons, the Bridgehead application has to be accessible via the Connections HTTP server. If this is not possible in your environment, please contact support@panagenda.com. |
 In the ICS go to to Servers > > Server Types > > Web servers
Figure 20: Populate Web Server Plugins
...
| Note |
|---|
If you have a firewall between your HTTP and application server, please note that the panagenda Bridgehead ports need to be opened. Otherwise your HTTP server will not be able to access the Bridgehead cluster. |
11OPTIONAL
11. OPTIONAL: Adjust SPNEGO Configuration
| Note |
|---|
...
If SPNEGO is used, the panagenda Bridghead has to be added to its exceptions! |
In the ICS go to Security > Global Security > Web and Sip Security > SPNEGO Web Authentication:
 Select your SPNEGO filter
...
- Add
;request-url!=/bridgehead
...
- to the end of
...
- the Filter criteria, as shown on the screenshot:
...

- Confirm by clicking OK
...
 Store your adjustments with Save:
Figure 23: SPNEGO Configuration Adjustment 3
 If
If - If Dynamically update SPNEGO is is deactivated, you have restart your entire environment
...
12. Check Bridgehead Access and Version
Open https://<your connections url>/bridgehead. Login with the user you assigned the
the pbh_admin role to, see step 8 "Change Security Role" on page 22in the ConnectionsExpert Setup Guide.
You should see a line similar to the following:
{"status":"OK","ts":1476867238257,"version":"3.0.0"} 1524067997537...
If the status is OK ("status":"OK"), the Bridgehead installation has been successful.
...