panagenda GreenLight uses SSL encryption for communication between its backend and its browser based rich user interface. A SSL encryption requires a corresponding SSL certificate. By default, panagenda GreenLight uses a certificate created by panagenda.
To connect to the Web Interface, you have to confirm the warning you get from your browser.
 
If your environment policies do not allow the use of the panagenda SSL certificate, you can create your own SSL certificate or import an existing SSL certificate in GreenLight.
 

Creation of an own SSL Certificate or import of an existing SSL certificate is only required when it is NOT POSSIBLE to use the default panagenda GreenLight SSL certificate.


Import an existing  SSL Certificated on GL >v4.x  (optional)

  1. Copy PEM and KEY file to

v4.0/opt/panagenda/appdata/volumes/nginx
IMPORTANT: Please use the same filename for your keys!


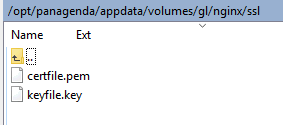
  1. open PUTTY console and execute: docker restart gl_nginx
    Wait until NGINX container is restarted and access again the Webpage of GL.
    The new SSL is now active:


Create a new SSL Certificate < v3.5 (optional)

The following describes the creation of a new SSL certificate for panagenda GreenLight using the "keytool" script. Follow these steps on the panagenda GreenLight appliance console: 

  1. delete the current certificate: sudo /opt/java/bin/keytool -delete -alias tomcat -keystore root/.keystore(the default keystore password is "changeit")
  2. create the new certificate: sudo /usr/lib/jvm/jdk/bin/keytool -genkey -alias tomcat -keyalg rsaa "wizard" will guide you through the creation of the new SSL certificate
  3. When asked for your "first and last name", provide the IP address or domain name for your panagenda GreenLight appliance 
  4. When asked for a password for the key, provide the default password "changeit"

 
After the appliance restart, your newly created certificate will be used for SSL connection encryption – therefore no warnings will appear when a connection is established from a browser to the virtual appliance.


Import an existing  SSL Certificated on GL <4.0  (optional)

  1. Copy PEM and KEY file to

v3.5   → /opt/panagenda/appdata/volumes/gl/nginx/ssl   (overwrite/backup existing ones)
IMPORTANT: Please use the same filename for your keys!


Import an existing SSL Certificate < v3.5 (optional)

If available, you could import your own SSL certificate by following these steps on the panagenda GreenLight appliance console: 

  1. Copy the certificate to /tmp
  2. Remove self issued cert from keystore sudo /usr/lib/jvm/jdk/bin/keytool -delete -alias tomcat -keystore /root/.keystore
  3. Import private key to /root/.keystore sudo /usr/lib/jvm/jdk/bin/keytool -importkeystore -srcalias 1 -srcstorepass <pfx-password> -srckeystore /tmp/yourprivkey.pfx -srcstoretype pkcs12 -destkeystore /root/.keystore -deststoretype JKS -destalias tomcat
  4. It is import that your private key uses the same password as the keystore, so change it to changeitsudo /usr/lib/jvm/jdk/bin/keytool -alias tomcat -keypasswd

Note

You have to type the password three times, first for the keystore and two times to change the password.

After the appliance restart, your imported certificate will be used for SSL connection encryption – therefore no warnings will appear when a connection is established from a browser to the virtual appliance.