Whitelisting of your install instructions ensures that they cannot be tampered with later on - in other words: no-one but you can edit relevant instructions in MCUpgrade.ini. All instructions are then signed and tamper proof.
Before you perform your very first whitelisting, switch to the Elevation tab in your Upgrade Configuration document and click on the button Launch KeyfileEditor. Next, select Tools\Create keypair...:
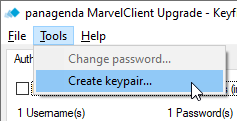
This will generate two files, a private and a public key signature file:
%PUBLIC%\MCUpgrade\build\MCUpgrade_PrivateKey_STORE_SAFELY_DO_NOT_SHARE.sig
and
%PUBLIC%\MCUpgrade\build\MCUpgrade_PublicKey.sig
IMPORTANT
Once created, make sure you treat the PRIVATE key file like your Notes certifier id. Only users with the private key file can create and update Upgrade configurations that correspond to your public key file!
Make sure you backup your private key file to a safe and secury location.
NOTE that the signature files are not password protected. Whoever has access to the private key file can create and update Upgrade configurations that correspond to your public key file!
Once you have created the files, you can perform whitelisting for any of your Upgrade configurations, using THE SAME key pair FOR ALL your upgrades and updates.
Whitelisting is automatically performed when preparing or publishing an Upgrade. In the vast majority of cases, the KeyFileEditor will be displayed for a few seconds during the publishing process and close again automatically.
Should it stay open after launching, or display any red icons (see below), or if it is launched directly from e.g., Windows Explorer, then the interface looks as follows:
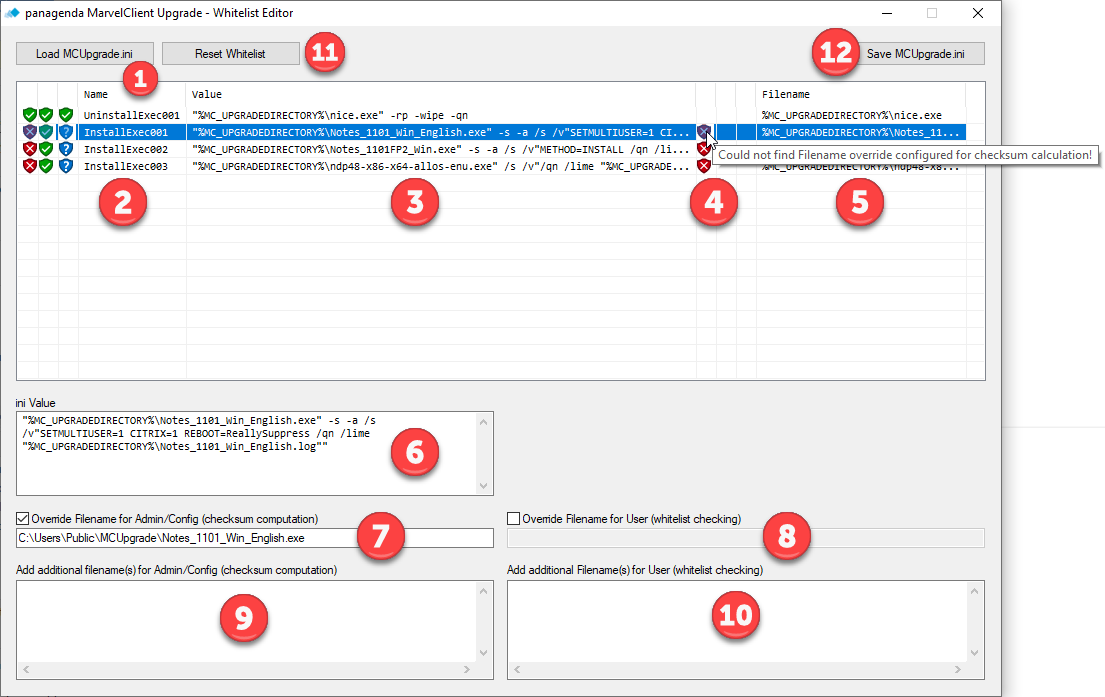
- Load MCUpgrade.ini: upon publishing or preparing an Upgrade, the correct MCUpgrade.ini file is loaded automatically.
- List of MCUpgrade.ini uninstall and install entries.
NOTE: Various other MCUpgrade.ini instructions are whitelisted automatically (e.g., StopServices, KillProcesses, and many more) - They are not displayed in the Whitelisting Editor, as they do not require any configuration. - List of MCUpgrade.ini uninstall and install values.
- Icons displaying additional information or warnings for each uninstall and install instruction. Hovering over any icon in the interface explains the meaning of each icon.
- List of file names parsed from the corresponding uninstall and install instruction.
- Full uninstall/install value (same as 3, but fully editable)
- Override filename for checksum computation during publishing. Whilst during an upgrade, the installer files typically reside in %PUBLIC%\MCUpgrade, during publishing they may be stored in a different location from the Administrator's perspective.
- Override filename for checksum computation during an upgrade. In rare cases, you may not want to protect a particular install instruction, or compute the checksum for a different file during an upgrade.
Example: One instructions unzips an installer, for which you disable checksum computation, but then perform checksum computation for one of the unzipped files instead. - In very rare cases, during publishing, you may want to not only checksum the file referenced in an install instruction, but additional files, too.
Example: Checking a zip file and multiple files after unzip. - Same as 9., but for checksum computation during an upgrade on end user machines.
- The Reset Whitelist button clears the entire whitelist as loaded via 1.
- The Save MCUpgrade.ini button saves the Whitelist and performs checksum computation for all files according to your configuration.
You are also prompted to save the whitelist if you made any changes and attempt to close the KeyfileEditor via ALT+F4 or the top right windows close button (X).
Again, when launching the KeyfileEditor from the MCUpgrade Configuration Wizard, all whitelisting should occur automatically, including opening and closing of the KeyfileEditor.