This document describes how to enable, but not deploy MarvelClient Essentials in an environment with IBM Notes client >= 10.0.1.
For Notes 9.x clients, you need to also deploy the client binaries - in that case, please see Rollout of panagenda MarvelClient to Multiple End Users.
Before carrying out the below steps, please ensure that the design of the MarvelClient Config database is dated 20181122* or newer
The current version can be checked be clicking on the "About" link in the lower right corner of the MarvelClient config database, or via the Notes client menu Actions\About.
If your current version is < 20182211*, please run an Online Update via Administration\Online Update and close and re-open the database thereafter.
If your MarvelClient Config database is newer than 20182211*, you can simply create a MarvelClient Installation document as follows:
1.) Create a new Installation document via Administration\Installation → New Install
2.) Select whether you want to create emails with installation code or a PostOpen script for e.g., the mailfile template
![]()
Mailbased Install
3.1.) Review all fields and adjust as wanted; the following instructions only cover the most important ones:
3.2.) Choose whether you want to send out emails with a stored form (recommended) or button:

3.3.) Specify a subject for the email to be sent (ideally one that makes users open/read the email), together with one or multiple recipients (people and/or groups):
![]()
3.4.) Choose one or multiple target platforms, for which you wish to enable MarvelClient Essentials:
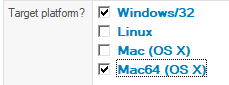
NOTE: MarvelClient Essentials is available for Windows and Mac 64 bit "only".
3.5.) Select the desired install behavior on Citrix - this is either "Run on Citrix but do not deploy any files" (recommended) or "Do not run install on Citrix":

3.6.) The options "Mailfile Owner", "Repeatable after successful installation" and "Repeatable after failed installation" are important to think through:
In general we recommend to check both "Repeatable*" options, as usually installations only fail when a user is offline when reading the install email, and users often have more than one machine, so allowing them to repeatedly use the install mail on multiple clients is needed.
Checking the "Mailfile Owner" option is a good idea, if all users have their own personal mailfile, to prevent installation by delegates from within other people's mailfiles.
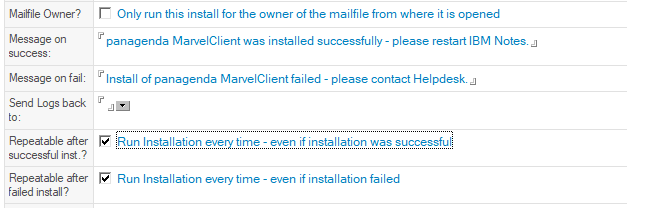
Also, it's a good idea to specify an email address to send logs back to - for smaller deployments this could be your personal email address, for larger deployments with thousands of users you may wish to use a mail-in database.
3.7.) Specify on which server the MarvelClient client component can find the MarvelClient config database:

In larger deployments it is recommended to use the first "Use %notes_homeserver% to synchronize" option to ensure that each client opens the MarvelClient config database on the mailserver of each end user.
For testing and smaller deployments, you may want to specify a dedicated server name through the second option.
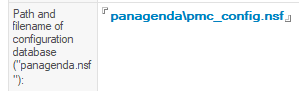
3.8.) Enter the filepath of the MarvelClient Config database on the server chosen under 3.7. - for a standard install this is
panagenda\pmc_config.nsf
3.9.) The "Target directory" option can be ignored as we will not be adding/deploying and client binary files:

3.10.) Make sure that you speficy pmc.dll as the Microsoft Windows target file name and libpmc.dylib as the Apple Intel Mac OS X 64 bit file name:
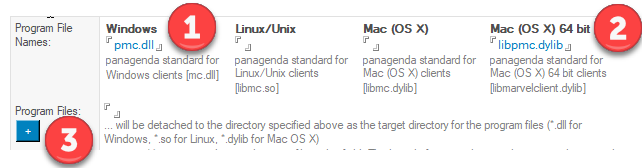
NOTE: Please do NOT attach any program files via the "+" button - the goal is to create an install document that does not deploy any binaries, but only enables them.
3.11.) Upon saving the document, the following warning is displayed:

Since this is exactly what we want to do, you can click on OK.
3.12.) Next, you will be prompted whether you want to send out the install mail according to your configuration:
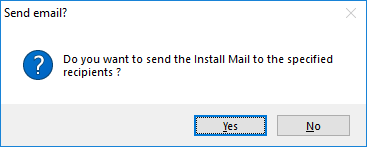
Click Yes whenever you are ready to send out the install mail.
After closing the document, you can return to it and re-use it any time to adjust the configuration or specify new recipients.
(Mailbox or other database's) PostOpen Script
4.1.) Review all fields and adjust as wanted; the following instructions only cover the most important ones:
4.2.) If you wish to add the install code to e.g. the mail template, but only want to test installation with select users or groups first, simply enter the corresponding user names and/or groups into the "Restrict Readers" field:
![]()
4.3.) Choose one or multiple target platforms, for which you wish to enable MarvelClient Essentials:
NOTE: MarvelClient Essentials is available for Windows and Mac 64 bit "only".
4.4.) Select the desired install behavior on Citrix - this is either "Run on Citrix but do not deploy any files" (recommended) or "Do not run install on Citrix":
4.5.) In general it's a good idea to specify an email address into the field "Send logs back to" - for smaller deployments this could be your personal email address, for larger deployments with thousands of users you may wish to use a mail-in database.
4.6.) Specify on which server the MarvelClient client component can find the MarvelClient config database:
In larger deployments it is recommended to use the first "Use %notes_homeserver% to synchronize" option to ensure that each client opens the MarvelClient config database on the mailserver of each end user.
For testing and smaller deployments, you may want to specify a dedicated server name through the second option.
4.7.) Enter the filepath of the MarvelClient Config database on the server chosen under 4.6. - for a standard install this is
panagenda\pmc_config.nsf
4.8.) The "Target directory" option can be ignored as we will not be adding/deploying and client binary files:
4.9.) Make sure that you speficy pmc.dll as the Microsoft Windows target file name and libpmc.dylib as the Apple Intel Mac OS X 64 bit file name:
NOTE: Please do NOT attach any program files via the "+" button - the goal is to create an install document that does not deploy any binaries, but only enables them.
4.10.) Upon saving the document, the following warning is displayed:
Since this is exactly what we want to do, you can click on OK.
4.11.) Click on "Generate PostOpen Script" on the top right of the document and follow instructions in the remarks at the top of the generated code.
Should you want to embed the code into a different database (e.g., the phone book application or similar that all end users access on ideally a daily basis or even more often), then you can simply paste the code into Code\Database Script of that application and insert MC_Install into the PostOpen section.
You can also add the code to the Database Script and PostOpen event of bookmark.ntf on client deployments, if you do not have a central database that all your end users access frequently. In this case, you would have to deploy the code to all bookmark.ntf files across your clients (for multiuser setup, don't forget the mui subfolders) and trigger a design update by deleting TemplateSetup from notes.ini.
After closing the document, you can return to it and re-use it any time to update the configuration and code if needed.
NOTE that when you update the configuration, you must also update the code in the correspdonding database.