
For VMWare products, we recommend raising the hardware version of the virtual machine according to your environment.
Further information: https://kb.vmware.com/s/article/1010675
Welcome Screen and IP Address
After starting up the appliance for the first time, you should be presented with a panagenda iDNA Applications welcome screen. If your network has a public DHCP server available, the system might already have acquired an IP address and will display the URL. Use the shown IP address (interface URL) in your web browser to connect to the panagenda iDNA Applications web interface. If DHCP is not available within your network or the panagenda iDNA Applications appliance did not acquire any IP address, you have to configure the panagenda iDNA Applications appliance network settings (see further below).

Appliance Login
iDNA Applications provides a console and a graphical user interface in order to configure operating system level settings like network, time and time zone settings.
Default login information:
user "root" with password "config"
Changing default credentials:
Default credentials are supplied for setup and initial configuration. It is not recommended to keep using them after the appliance has been set up.
We strongly suggest changing the default credentials for these components:
- Linux user "root" (using the "passwd" command)
- VNC server (see Remote Appliance Access (VNC))
- Web user "config" (see Change Password)
Console
After login, basic information, such as disk space, system time and IP address, are shown: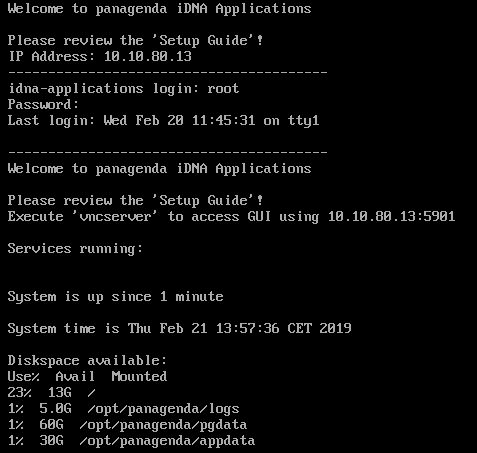
Graphical User Interface
There are two ways to use the GUI to configure your iDNA Applications appliance:
- Local
In order to start the GUI locally, enter the command "startx"
To start the GUI automatically when iDNA Applications is booted, please enter the following command: "systemctl set-default graphical.target" Remote Access via VNC
Please note that remote VNC access is only possible at this point if the iDNA Applications appliance already received an IP address via DHCP.
Please refer to Remote Appliance Access (VNC) for more details.
GUI Basics
The Actions and Applications menus provide access to all required applications:
To check an established internet connection, a web browser (Mozilla Firefox) is available on the panagenda iDNA Applications appliance.
You can use the terminal window to check if your TCP/IP connection is established, using Linux ping and ifconfig command. For more information about ping and ifconfig commands, type man ping or man ifconfig in the terminal console window.
panagenda iDNA Applications log files can be found within the /opt/panagenda/logs directory. The main log file (idna/idna.log) holds essential information about panagenda iDNA Applications runtime behavior. Use the Files application to navigate to these log files.
To check the panagenda iDNA Applications appliances system behavior, you can use the installed system monitor.
Network Settings:
To change the IP address and DNS configuration please click on the network symbol on the top right menu bar, expand the "Wired ..." section and click Wired Settings.
Alternatively, you can open the settings menu (Right-click on the desktop or Applications/Activity menu) and go to the "Network" section.
In the "Wired" section, click the cogwheel to edit network parameters:

Go to the IPv4 Settings tab and select Manual from the Method drop down menu to configure the network settings as required:
Editing DNS search domains:
TIP: Configuring DNS search domains will help with resolving server names that may not be fully qualified. e.g. being able to find a Domino server by its common name only can be very beneficial
Search domains can be configured in the /etc/resolv.conf. See this guide for further information.
If a manual IP address is set on the server, the DNS search domains have to be configured manually. Unfortunately, this configuration option is no longer available in graphical network configuration dialog. In order to configure search domains, it's text-UI counterpart must be executed:
- In a console window, execute the command to launch the Network Manager Text User Interface: nmtui
(Navigate with cursor keys and the tab key and use Enter to confirm selections) - Select "Edit a Connection"
- Select "ens160"
- You may have to select "Show" next to "IPv4 CONFIGURATION" in case its configuration options are hidden
- Under "Search domains" select "<Add...>" and add as many search domains as are useful in your environment
- Navigate down to "<OK>" to save and close the settings dialog
- A restart of the NetworkManager service or a reboot will be required to activate these changes

Host Name Configuration:
The host name of the appliance must be changed to reflect the DNS settings in the customer's environment. To do so, the files /etc/hostname and /etc/hosts must be edited. iDNA must be able to reach itself under the name it is accessed by users.
Host name restrictions
Important: The host name MUST NOT be simply "idna", as that may lead to connectivity issues.
Information: The virtual appliance MUST be able to resolve its own host name. Please verify that by opening a terminal window (click "Terminal" on the desktop) and using the ping command. It is recommended that both host/common name as well full qualified domain name are pingable. See System Requirements for incoming and outgoing network access requirements.
Editing "/etc/hostname"
Only the common name of the iDNA server is entered here without the domain part (e.g. server1, NOT server1.acme.com).
Edit this file using the commands nano or vim in a text-only terminal or gedit to open a graphical text editor (e.g. nano /etc/hostname).
Please note that the iDNA Applications notification feature uses this host name in emails to identify from which server the email has been sent. For further details refer to Setup Notifications (Mailprofile).
Editing "/etc/hosts"
In this file, both the common name AND the fully qualified host name are entered as additional alias for 127.0.0.1 (separated by space, see screen shot below). The existing aliases "localhost" and "localhost.localdomain" must remain as aliases.
Edit this file using the commands nano or vim in a text-only terminal or gedit to open a graphical text editor (e.g. nano /etc/hosts).

Reboot Required After Configuration Change
Changes in any area of networks settings requires a restart of the NetworkManager service or a reboot. We recommend rebooting the appliance after applying these three changes.
Time Zone Settings:
Open the settings menu (Right-click on the desktop or Applications/Activity menu) and go to the "Date and Time" section.

It is very important to adjust the appliance's time zone!
Please reboot the appliance after changing the host name or date/time settings as the web server and database system require a clean start with the new configuration.Keyboard Settings:
Open the settings menu (Right-click on the desktop or Applications/Activity menu) and go to the "Keyboard" section.
Add your desired keyboard layout and drag it to the top of the "Input Sources" list.
