Prerequisites
- Make sure that you have installed the MarvelClient databases
- Make sure that you have installed/enabled MarvelClient on at least your MarvelClient Upgrade test client
- Make sure that your installation is up-to-date (see Online Update)
- Download all installers (full client, fix packs, language packs, addons, ...) that you wish to use - ideally onto the computer from which you will create the upgrade (using them from a network resource will work, but slooooowly)
- Make the installers available via either a UNC path, a mounted network drive, or a web (http(s)) server.
IMPORTANT
ALL tabs in the Upgrade Config Wizard are documented in detail here.
Creating your first Upgrade is easy and fast:
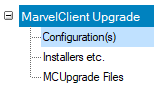
- Open the MarvelClient Configuration database and navigate to MarvelClient Upgrade\Configuration(s):
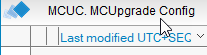
- In the view, click on MCUC. MCUpgrade Config:
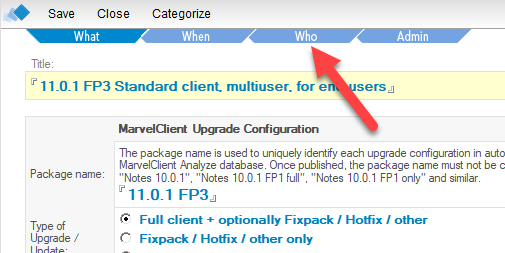
- (1) Enter a descriptive title (e.g., 11.0.1 FP3 Standard client, multiuser, for end users)
(2) Enter a package name (e.g., 11.0.1 FP3)
(3) Choose whether you want to perform a full or fixpack upgrade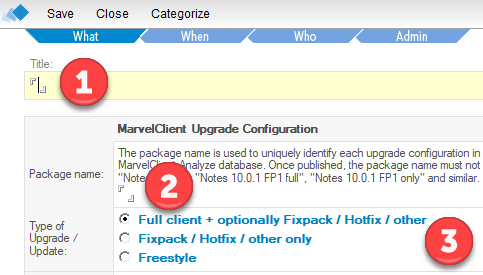
On the Distribution tab:
(1) Click on Index Installer(s) and select all installers you wish to use
(2)+(3) After indexing your installers, select them in the corresponding fields for full / addon installer selection: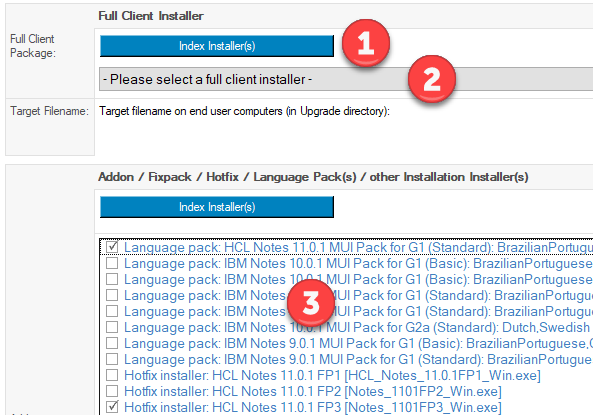
IMPORTANT
For major version upgrades, we strongly recommend to create two separate packages for users with Admin and/or Designer client, and normal end users!
Since a major version upgrade has a much higher success rate, if the previous client is uninstalled, the full client installer no longer knows which components were previously installed.
Simply select the corresponding installer on the Distribution tab and make sure to deploy it to the correct types of users on the Conditions tab.Good to know
Woohoo! From here on, the Prepare or Publish Upgrade button is clickable!
If you don't want to read any further, then just keep clicking on it, until you've filled in everything needed - the button will validate everything for you
We recommend not to forget pt. 6. below, though!
Also, you may want to limit the users who get your first upgrade on the Who tab at the very top of the Upgrade Configuration document.- Also on the Distribution tab:
Specify from where your end users clients can download your installers. The location can be a UNC path, a mounted network drive, or a web (http(s)) server: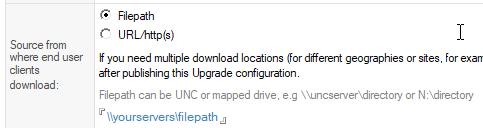
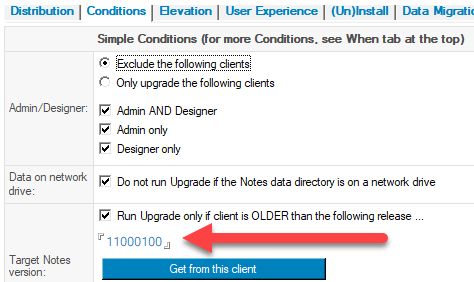
- On the Condition(s) tab, adjust the target version number to match the selected installer(s):
The expected format is this: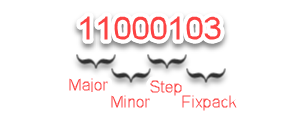
- On the Elevation tab, click on Launch KeyfileEditor - if you want to use a different elevation option than local or domain Administrator, then see The Elevation tab

- In KeyfileEditor - if you want to use a different elevation option than local or domain Administrator, then see The Elevation tab
(1) Fill in the account name(s) of your Administrator account(s) - this can be a local or domain Admin account
(2) Fill in the password(s) for the Admin account(s) specified in (1)
(3) For domain Admin accounts, specify the domain name(s)
IMPORTANT: For local Admin accounts, use @ComputeName, including the @ sign!
(4) If your SMTP server requires authentication, enter the respective username and password here
(5) Click on File\Save as..., enter a password of choice twice to protect your file, and save the MCUpgrade.mcu file to %PUBLIC%\MCUpgrade\build
(6) Close the KeyfileEditor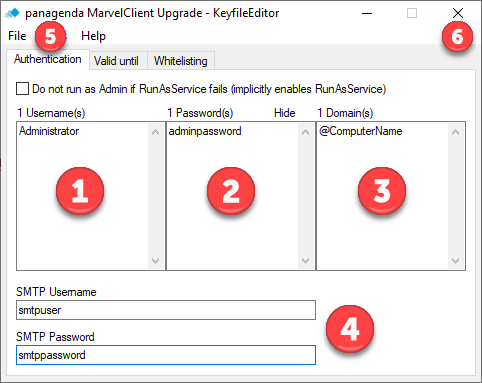
- If you chose a full upgrade (not "just" fixpack), then on the Setup tab,
(1) Replace %SERVERNAME% in the line
MC_DB_NotResolvable=%SERVERNAME%!!<mc:configdb_path>
with the servername on which clients can find the MarvelClient Configuration database, in case they cannot resolve their mail/home server
Example: MC_DB_NotResolvable=cronus!!<mc:configdb_path>
(2)+(3) Adjust the lines Domino.Name and Domino.Address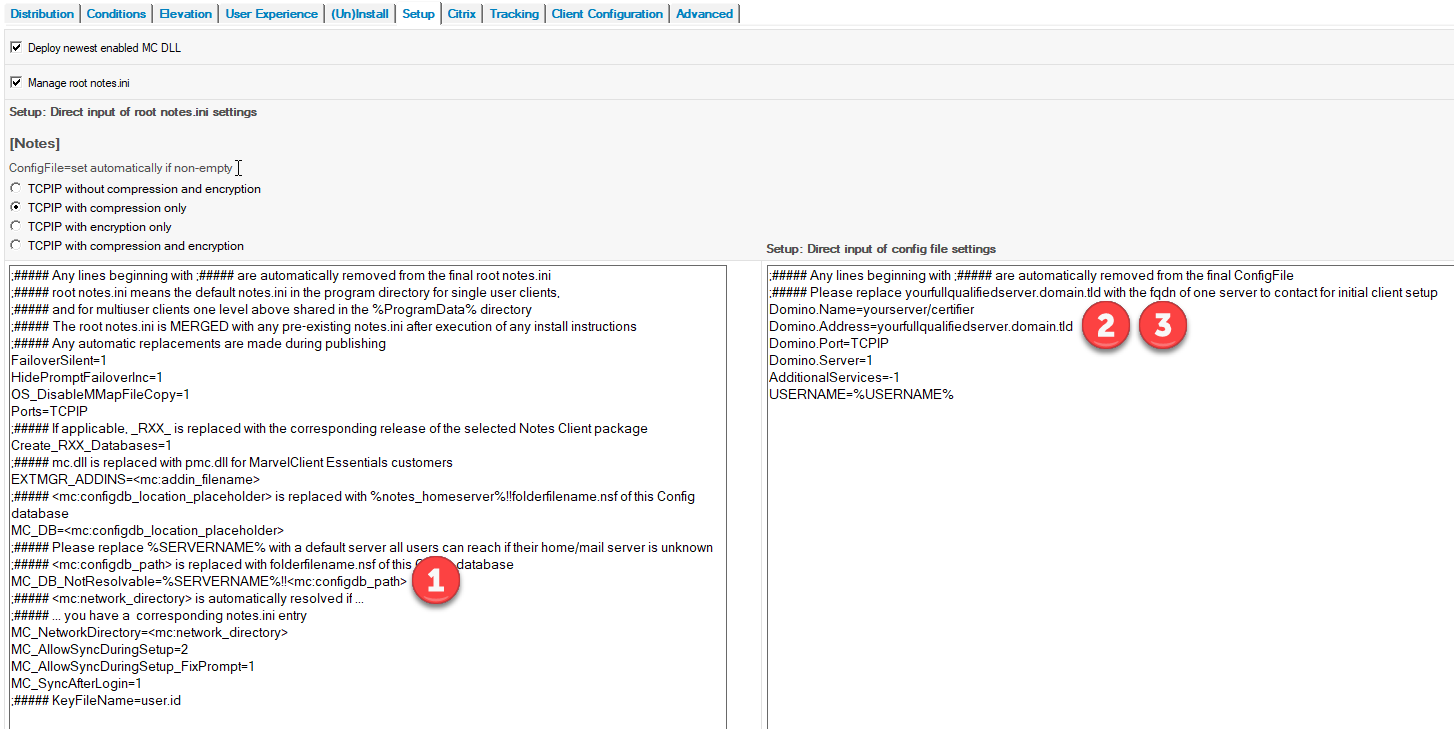
- On the Tracking tab:
(1) Fill in the DNS name of your smtp server
(2) Fill in the From Email Address
(3) Fill in the To Email Address
(4) Test SMTP Email, so that your MarvelClient Upgrade can send you status updates from your clients!
- If MarvelClient is installed on more that just your first test client, then you may want to limit your first upgrade to one or a few users with the Who tab at the very top of the Upgrade Configuration document.
- Finally, click on the big blue Prepare and Publish Upgrade button above the tabbed table ...

... and then Yes in the following dialog: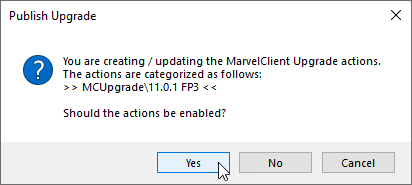
Congratulations! You have now successfully created your very first upgrade!
Continue with What happens / what to check for upon publishing an (enabled) Upgrade Package!