Installation Types
Installing the panagenda MarvelClient databases allows for the following types of installation.
Local Installation
In this setup, both databases (Config and Analyze) are installed on a local HCL Notes client.
Whilst a local installation is well suited for a quick evaluation, it does not allow for testing with multiple users.
Dedicated Server
In this setup, both databases (Config and Analyze) are installed on one dedicated HCL Domino server.
Whilst we do not recommend to use a dedicated server for lack of potentially needed scalability, you can “hard-code” MarvelClient to use one particular server as opposed to each user’s mailserver.
If used for production purposes, all users and/or test servers must have a good connection to this server. The server also needs to be able to process the maximum number of concurrent sessions at peak times – this number depends on the number of users that potentially log on during peak working hours and the session duration on the Domino server.
Recommended for environments up to a few thousand users: Load-balanced/Production
In this setup, the Config and Analyze databases are replicated across all mail servers, where each Analyze database contains *all data from all users* across all mail servers.
The advantage of this "non-hardcoded" installation type is, that any change at the server level (such as moving a user from one Mailserver to another, or adding new servers) doesn’t affect MarvelClient: In notes.ini; the corresponding MC_DB= entry refers to "%notes_homeserver%!!YOURDIRECTORY\YOURCONFIGDATABASENAME.nsf" , which means that there is no hard-coded servername.
Note: %notes_homeserver% is dynamically resolved from a user's then current location document.
Also note: You must make sure that the Audit agent in the Analyze database only runs on ONE server, which then replicates audited documents back to all other servers (if each mail server were to run the audit agent, this would generate a large number of replication conflicts).
Recommended for all environments, especially for many (hundreds of) thousands of users: Hub/Spoke
Similar to the Load-balanced/Production type install, the Config and Analyze databases are replicated onto every mail server, too. However, in order to reduce the size of the Analyze database on each mail server to just the documents of each mailserver's respective user population, you choose for a "Hub and Spoke" setup: In this setup scenario, all Analyze databases are replicated together into one large Analyze database on a hub. In the Analyze database, the only hub server is granted the role “[Admin]”, whereas the mail servers are not. Thereby the Analyze databases on mail servers only store the analyze data of “their own users” and replicate it to the hub, where all data is gathered.
Note: As to avoid replication conflicts, you must only schedule the Audit All Agent in the Analyze database on EITHER the hub only OR all spokes excluding the hub.
Server Installation
Please note that panagenda MarvelClient is fully integrated into HCL Nomad Mobile (starting with version 1.0.4), so HCL Nomad Mobile does not require any client-side installation.
The MarvelClient Install Wizard
- You may want to read through the System Requirements and Installation Types before installing panagenda MarvelClient - in general it's also a good idea to read through MarvelClient: Good to know.
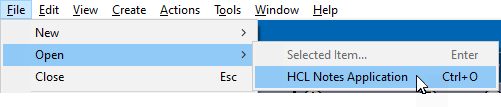
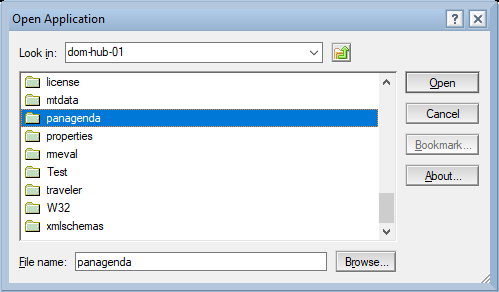
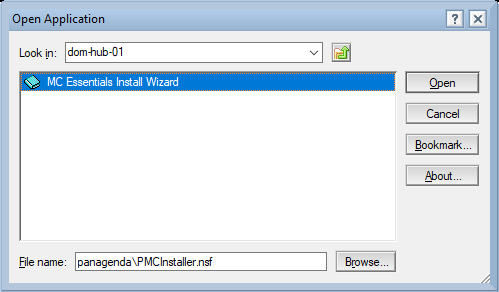
To install the MarvelClient Databases on an HCL Domino server, open the MarvelClient Installer database:
If you have a Domino 10.0.1 server or newer, select File\Open\HCL Notes Application in your Notes client > enter the servername of your Domino server > Open the panagenda folder > Open the MC Essentials Install Wizard:
- If you do not have a Domino server >= 10.0.1 yet, you can download the MarvelClient Multi-Edition Installer here.
You can simply download the Installer to your local Notes client and open it from there.
After opening the Installer, click on the "Install panagenda MarvelClient" button:
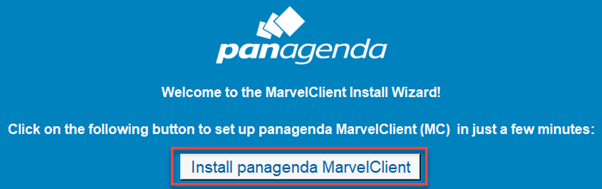
Just follow the instructions of the Install Wizard.
If during installation you choose settings different from the default, take a note as you will need them again later on.
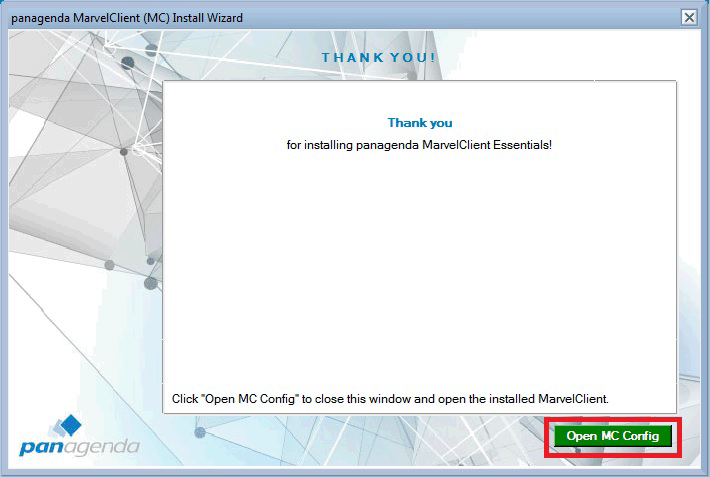
- Once your Installation has finished and you have clicked on "Open MC Config", please perform an Online Update. For details see Updating the MarvelClient Config and Analyze Databases.
- Depending on your Notes client release(s), continue as follows:
For Notes client releases < 10.0.1, rollout and enable the MarvelClient Essentials as described here: Rollout of panagenda MarvelClient to Multiple End Users.
- For Notes client releases >= 10.0.1, but < 12.0, enable MarvelClient Essentials as follows: Special Option to enable but not deploy MarvelClient Essentials
- For Notes client release >= 12.0, simply enable MarvelClient Essentials.
- As soon as you restart any client with MarvelClient Essentials (make sure to also close any Admin and Designer clients, if applicable), they will upload data into the MarvelClient Analyze database.
More information on manual MarvelClient installation options can be found the following knowledge base articles: https://www.panagenda.com/kbase/x/2ofo.
Update Server Databases
After the creation of the databases, please perform an online update in the Configuration database as follows:
The panagenda MarvelClient databases can be updated in two different ways:
Automated Online Update
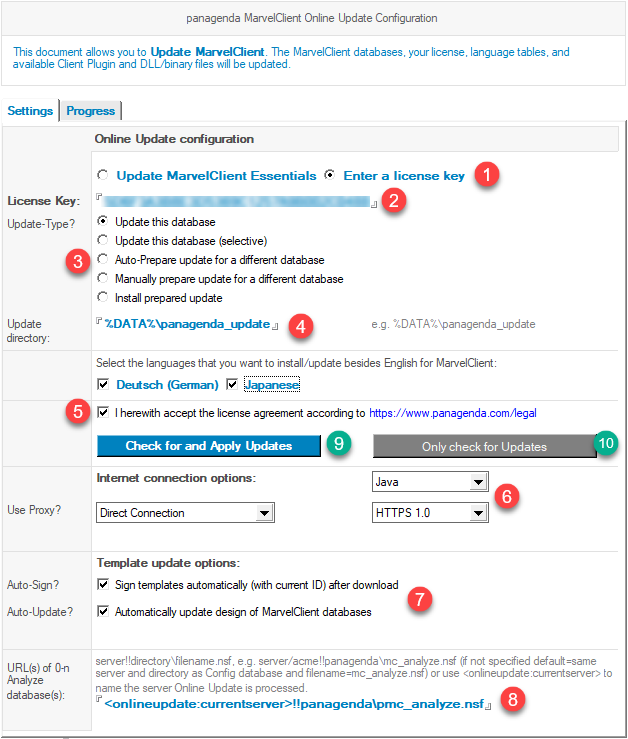
A. In the MarvelClient navigator go to Administration\Online Update, which requires the ACL role [AOnlineUpdate].
B. Fill out the Online Update Page:
- Select whether you want to "Update MarvelClient Essentials" or "Enter a license key"
- If you chose "Enter a license key" under 1., please enter your 32 character license key
- As Update-Type, select "Update this database"
- Adjust the update directory if desired, or leave the default which is %DATA%\panagenda_update.
The update directory is usually only important if you prepare updates for different Configuration databases - Please read and accept the license agreement (http://www.panagenda.com/legal)
- The standard protocol version is HTTPS 1.0; in rare cases you may have to use HTTPS 1.1,
or even just HTTP 1.1 or 1.0. An Online Update of type Java is required for customers in Asia.
All other customers can select between LotusScript (=recommended) or Java based Online Update.
A Java based Online Update is usually faster, whereas a LotusScript based Online Update allows to
establish the update connection based on system settings
Choose Direct connection, proxy connection or connection according to system settings
(LotusScript based Online Update only). When selecting a Proxy connection, please make sure that you
enter the Proxy server including the port number, such as “MyProxy.MyDomain.com:3128” - The update process can also use the Notes ID currently in use to automatically sign design elements
after a design update, which is recommended only if an administrator or signing ID is used to perform
the online update. For existing installations, the Online Update can not only download new templates
but also update the design of your existing databases automatically. - Specify the path to one or multiple Analyze database(s)- Examples:
<onlineupdate:currentserver>!!panagenda\pmc_analyze.nsf
<onlineupdate:currentserver>!!panagenda\mc_analyze.nsf
or
MyHubserver!!admin\analyze.nsf To run the Online Update click the "Check for Update" button
- Alternatively you can click the "Only check for Updates" button in case you just want to check the availability of updates (and run it later).
Note that during an Online Update, %notes_homeserver% is automatically replaced with the current mail server of the user running the update, <onlineupdate:currentserver> is automatically replaced with the server of the Config database in which the Online Update is carried out from.
The path of the Analyze database is needed to check whether the design of it is up to date. If you have multiple Analyze databases that do NOT replicate, please specify multiple URIs. If your Analyze databases do replicate, then you should only specify ONE master replica.
Release Notes
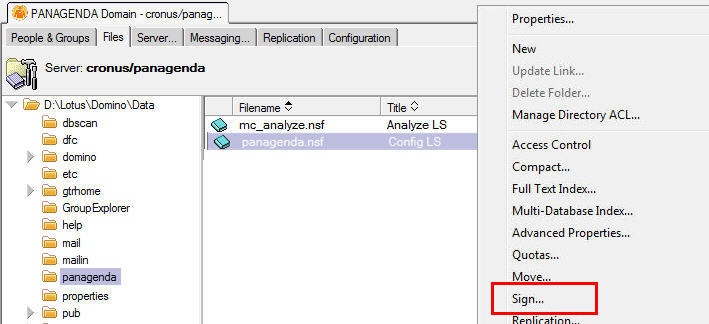
C. If you did not select for the Config database to be signed in step 7 above, then open your Admin client, navigate to the location of your MarvelClient databases, right-click on the MarvelClient Config and Analyze database and select “Sign”. Then select your desired signing ID and sign all design documents. Ideal signing IDs have the right to run agents on the server and have access to both the MarvelClient Config and Analyze database.
NOTE that for MarvelClient Essentials the default filenames are different from above screenshot: panagenda\pmc_config.nsf and panagenda\pmc_analyze.nsf.
D. For existing MarvelClient installations (NOT for MarvelClient Essentials), after each Online Update, check the "License Update" view to ensure that the latest license is enabled.
Online Update does enable new (if checksum is different) licenses automatically - except for when running your very first Online Update without any license document at all yet.
E. For existing MarvelClient installations, please also check the "DLL Updates" view as a newer binary for e.g., Windows or Mac 64 Bit may have been dowloaded, in which case the new documents are DISabled by default. Enable them once you are ready to use the new DLL and be aware that all users will automatically update their binary as they restart HCL Notes. You may want to restrict new binaries on the Who tab for testing purposes first.
Also, don't forget to check the option "Always detach binary/"DLL" to Notes data directory" to ensure that updates also work for users for whom the binary has initially been deployed to the Notes program directory (as is the case for MarvelClient Essentials, too).
Note that a binary update requires TWO client restarts: At the next client start, the old binary loads and downloads the new binary. Upon the next client (re)start, the new binary is loaded.
Manual Update
A. To manually update the MarvelClient Config and Analyze databases, download all files from http://update.panagenda.com/pub/panaweb.nsf/getlicenseinfo?openagent&key=LICENSEKEY and follow instructions as shown on the resulting page.
For MarvelClient Essentials, use the following URL: http://update.panagenda.com/pub/panaweb.nsf/getlicenseinfo?openagent&key=MCEssentials
Note: There is no need to download the license file for existing installations - unless your license changed since the last Online Update.
B. Once all files are stored in the directory on your workstation, which is set as "Update directory" (see step B4 above), run the Online Update while set to "Install prepared update" (see step B3 above).
Note: If you select "Install prepared update" (see step B3 above) for a manual Update, B6 (connection settings) is not relevant - the rest of the process is the same as described above.
Client Setup
Please note that panagenda MarvelClient is fully integrated into the HCL Nomad app (starting with version 1.0.4) - no further installation is required for the local MarvelClient file. Please refer to the following knowledge base page for further details: https://www.panagenda.com/kbase/x/fge0AQ.
The below instructions are for panagenda customers:
In order to install MarvelClient on your very first client, you may either include it in a rollout to multiple clients or proceed with a manual installation as follows:
In the Configuration database, click on Administration\DLL Updates and open the document for the respective operating system (newest at the top).
If you do not see any documents in the view DLL Updates, please perform an Online Update.
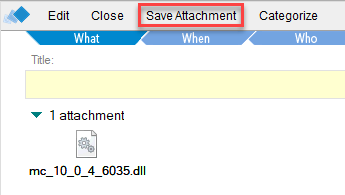
Save the attachment as pmc.dll/libpmc.dylib/mc.dll/libmarvelclient.dylib/mc.so (=without the version information → e.g., change mc_10_0_0_4_6035.dll to just mc.dll) into EITHER your HCL Notes Program OR Data directory.
On Citrix it is highly recommended to deploy the binary to the HCL Notes Program directory, however not required.
- In notes.ini, please search for an entry “EXTMGR_ADDINS=” (casing does not matter = you might have an entry extmgr_addins or ExtMgr_Addins or similar)
- If such an entry already exists, please add “mc.dll”, “mc.so” or “libmc.dylib” accordingly – without quotes, with comma separation – for example:
EXTMGR_ADDINS=EntryOne,EntryTwo,mc.dll If such an entry does not exist yet, add a respective new entry/line to your notes.ini:
EXTMGR_ADDINS=mc.dllNote that there must not be more than one “EXTMGR_ADDINS” line in notes.ini, as only the very first such line is relevant, any others are ignored by HCL Notes.
Also note that when adding a new line to notes.ini, the very last line of notes.ini must be an empty line (this has nothing to do with MarvelClient).Add another new line/entry to notes.ini as follows, only if you did NOT install the MarvelClient Config database according to the highly recommended default (panagenda\pmc_config.nsf for MarvelClient Essentials and panagenda\panagenda.nsf for panagenda customers):
MC_DB=Servername!!Directory\FilenameOfYourConfigurationDatabase.nsf
(Adjust Servername, Directory and Filename as needed)
Server and filepath are separated with a double exclamation mark (!!). Server and filepath must correspond to where you chose to install the MarvelClient Configuration database.
Please note, that “MC_DB” supports the placeholder “%notes_homeserver%” which is dynamically replaced at run-time with the then current end-user’s mailserver, for example:
MC_DB=%notes_homeserver%!!panagenda\panagenda.nsfini:MC_DB default values
If not set, the default for notes.ini:MC_DB for MarvelClient Essentials (pmc.dll/libpmc.dylib) is %notes_homeserver%!!panagenda\pmc_config.nsf
For panagenda customers, MC_DB defaults to %notes_homeserver%!!panagenda\panagenda.nsf
Further information about the rollout of panagenda MarvelClient to multiple end users is provided in the following knowledge base articles: https://www.panagenda.com/kbase/x/Eojo.