The Cinema Slide Editor can be found in the MarvelClient Configuration database, under MarvelClient Upgrade\Configuration(s)\Cinema Slides:
When creating or editing a slide, the following fields are available:
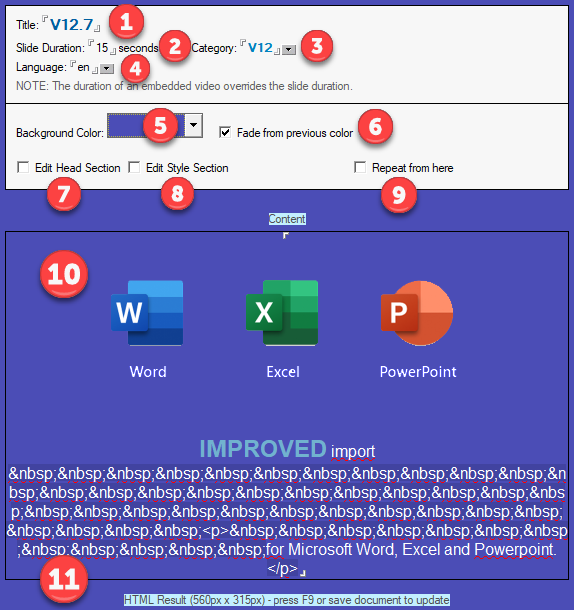
- Enter a descriptive title for the slide - all slides within the same Category and with the same language (see below) form a slide deck, in which all slides are played/sorted by title alphabetically.
- Enter a slide duration - the minimum slide duration is 1 second. The default slide duration is 15 seconds.
Slides with embedded videos will play as long as the embedded video. - Select or enter a category name - all slides within the same Category and with the same language (see below) form a slide deck, in which all slides are played/sorted by title alphabetically.
- Select or enter a language identifier (e.g. en, de, sv, it, or similar). During an upgrade, the slidedeck matching MCUpgrade.ini:UpgradeLanguage (or OS autodetect) will be used. if there is no dedicated deck for the language, the default deck will be displayed.
- Select a background color for the slide.
- When the progress bar slides from one slide to the next, it can blend/fade the background color when switching between two slides (e.g. fading from black to white whilst sliding).
If you do not wish for the background color to fade, simply deselect this option. - If you are familiar with HTML and need to add to the head section of a slide show, then simply check this option and enter your head content in the then shown Head Section field.
The following head content is always set:
<meta http-equiv="Content-type" content="text/html; charset=UTF-16" /><meta charset="UTF-16"/>
<meta http-equiv="X-UA-Compatible" content="IE=edge"/>
NOTE: Only the Head Section of the FIRST slide will be pubished into a slide deck! if you are familiar with HTML and need to add to the style section of a slide show, then simply check this option and enter your style content in the then shown Style Section field.
The following style is always set:body {background-color:#slidecolor}If "Edit Style Section" is unchecked, the following style will be set:
body {background-color:#slidecolor; font-family:Arial; margin:0px; padding:0px; border:none;}
p {font-family:Arial; line-height:20px; margin-left:7px; margin-top:5px; margin-bottom:0px; border:none;}
NOTE: Only the Style Section of the FIRST slide will be pubished into a slide deck!
- When checking the "Repeat from here" option, a slide deck with multiple slides will repeat from this slide, instead of the first slide.
This is useful to e.g. show slides 1–2–3–4 and then continue with 3–4 for the remainder of the upgrade.
NOTE: If multiple slides within one deck have "repeat from here" selected, the LAST slide by alphabet will be used as "repeat from here" slide. - Enter Notes rich text here to create your HTML slide content - for further details, see below
- When pressing F9 or saving the document, the Rich Text entered in 9. will be converted to HTML content.
Important notes for entering Rich Text content:
- We highly recommend importing images (via File\Import → GIF, JP(E)G or PNG, for example) instead of copy and pasting them via the clipboard.
When importing images, all colors and transparency are preserved. Copying and pasting images into a rich text field does not preserve colors. - Animated GIFs are supported, too

- HTML can be inserted by either using square brackets or marking content as passthru HTML via Text\Pass-Thru HTML, for example:
[<p>hello world!</p>]
When using square brackets, you must make sure that all text from inluding the opening until the closing square bracket has the same font (face, size and color!) - Whilst browser compatability is automatically set to IE-edge, the rendering is done using IE-11 - that has nothing to do with us, but with Microsoft Windows and the webbrowser control.
We are aware of the existence of webview2 and might support it in a future version of MCUpgrade. - Due to IE 11 rendering, animated PNGs are not supported.
- Any images in your rich text field are automatically converted to Base64 image data, so that the resulting HTML file has all images in it.
- We strongly advise NOT to use external videos (whether youtube or similar) or any external resources for that matter (e.g. fonts, images or similar), but provide all resources via internal servers or Cinema Resource documents.
- Speaking of videos: playing sound is not possible as users would have to interact with the video to unmute/confirm the playing of sound. And you really don't want all your end user computers to mak noise anyway.
Last but not least, you might want know a couple of useful HTML tags and codes:
| Tag/Code | Explanation |
|---|---|
| | Non-breakable space Whilst a blank ( ) might be wrapped into the next line, will not. Note: you must mark as Pass-Thru HTML via the Text menu. |
| <table border=0> | Opens a table, must contain at least one <tr> and <td>. Must be closed at end of table using </table> |
| <tr> | Opens a table row, must contain at least one <td> |
| <td> | Opens a table column. Must be closed at end of column using </td> |
| <div> | Creates a "container" which can be flexibly positioned and formatted using CSS. Must be closed at end of container using </div> |
| <p> | Creates a "paragraph" which - by default - has more spacing to the previous paragraph than when using <br/> Must be closed at end of paragraph using </p> |
| <br/> | Creates a line break. As stated above, sentence 1<p>sentence 2</p> has slightly larger spacing by default than sentence 1<br/>sentence 2 |